
Gonna make this intro SUPER quick. I'm off in disney gallivanting with the cast of Monster's Inc.

...and becoming an honorary Power Ranger...

...and gallivanting like a Princess

so here is my friend Alison showing you guys an amazing Pinterest inspired tutorial! Its le Lovely. And so is Alison.
Oh and before i forget, there is a giveaway going on for a handmade bracelet by Jessica N Designs! (you get to pick your color! Me personally I would go with Pink for breast cancer awareness month) Ente here :)
and in the words of my friends the Power Rangers--GO GO ALISONNNNNN!

Hi! I'm Alison from the blog and shop aPearantly Sew. A big thanks to Leonora for having me over at her space today. I have a quick and simple DIY project for you. I found inspiration for this framed button letter on Pinterest, which is where inspiration comes from so often these days, am I right? :)

You'll need: Mod Podge, a paintbrush, frame (whatever size you choose. I used an 11x17), hot glue gun, buttons in various sizes, burlap, a letter printed in whatever font & size you choose. A hot cup of coffee. That's right. Coffee. It's essential to any craft time if you ask me.
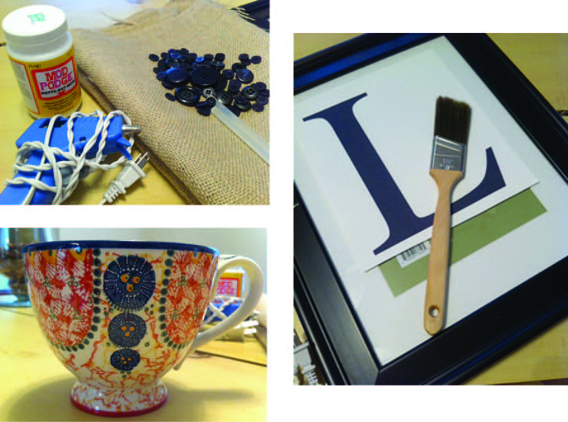
I started out by removing all of the pieces from the frame. You will not need to keep the glass or the mat. I (generously) applied Mod Podge to the cardboard backing of the frame, and then applied the burlap. Smooth out any wrinkles, and give the Mod Podge ample time to dry. Once dry, cut any excess from around the frame.
Next, cut out and trace your letter onto the burlap.

Then, just start hot glueing your buttons on. I would suggest starting from the center of the letter, and moving outward. I also found that every time I used my finger to press the button into place, hot glue went everywhere. So, I used a toothpick to press the buttons into place, and to remove any strings of hot glue that came about as a result of me not using the toothpick to begin with.

Once all of your buttons are glued on, and have dried, put it back in the frame and find the perfect place in your house to hang your new (super duper easy) creation!

SULLY!!!!! I saw that flick in the theaters ... like ... three times ...
ReplyDelete(Also, totally loving on that buttons and burlap initial!)
oh i love <3 this tutorial!! a keeper for sure :)
ReplyDeleteThis is so great! You did an awesome job!
ReplyDeleteCheers!
Reese
http://rambleswithreese.etsy.com
http://rambleswithreese.blogspot.com